
chicken run

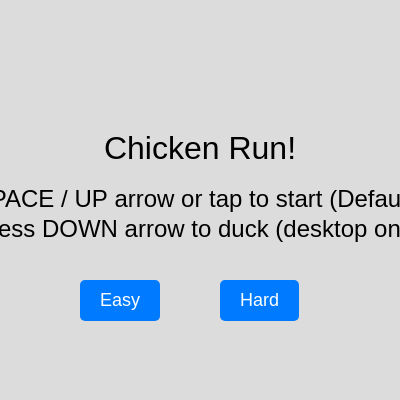
This sketch is a Chrome-Dino-style endless runner where a cartoon chicken sprints across a scrolling gray ground, jumping over bombs and ducking under flying bullets. The player picks an Easy or Hard difficulty, and the game speeds up the longer they survive, tracking a score that increases every time an obstacle is dodged. A single collision instantly ends the run and shows a Game Over screen with the final score.

🧪 Try This!

Experiment with the code by making these changes:

  1. Jump much higher — Increasing the magnitude of the jump velocity makes the chicken leap noticeably higher into the air.
  2. Slow the whole game down — Lowering the default speed makes obstacles scroll by much more slowly, giving you more reaction time.
  3. Flood the screen with bullets — Lowering the bomb probability means bullets - which require ducking instead of jumping - show up far more often.
Prefer the full editor? Open it there →

📖 About This Sketch

Chicken Run is a side-scrolling dodge game built entirely in p5.js: a yellow chicken runs in place while a gray ground scrolls beneath it, bombs roll in low and bullets zip through the air at head height, and the player jumps or ducks to survive. It's a great sketch to study because it combines several classic game-programming techniques - a finite state machine for start/playing/gameOver screens, function-based constructors that act like lightweight classes for the Chicken, Bomb and Bullet, AABB (axis-aligned bounding box) collision detection, and a seamless two-segment scrolling background.

The code is organized around three 'object' constructors (Chicken, Bomb, Bullet) that each bundle their own position, state and draw/update methods, plus a small set of screen functions (startScreen, playGame, gameOverScreen) that draw() switches between based on a gameState variable. Reading through it, you'll learn how to fake object-oriented programming in plain JavaScript with function() constructors and this, how difficulty settings translate into a single gameSpeed number that everything else reads from, and how real DOM button elements (createButton) can be shown and hidden to build a menu on top of a canvas.

⚙️ How It Works

  1. When the page loads, setup() creates a full-window canvas, calculates groundY, builds the chicken object, and creates two DOM buttons (Easy/Hard) that stay hidden until needed
  2. draw() runs 60 times a second and checks gameState to decide whether to show the start menu, play the game, or show the game-over screen
  3. Choosing a difficulty (or pressing SPACE) calls resetGame() to clear obstacles and set gameSpeed, then switches gameState to 'playing' and calls loop() to resume the animation
  4. Every frame in playGame(), the ground rectangles scroll left and wrap around, the chicken updates its position under gravity, and new Bomb or Bullet objects are randomly spawned based on frameCount and the current gameSpeed
  5. checkCollision() compares the chicken's bounding box (which shrinks and shifts when ducking) against each active obstacle's box using simple AABB math; any true collision immediately sets gameState to 'gameOver' and stops the draw loop with noLoop()
  6. Every time an obstacle scrolls off-screen or finishes exploding without hitting the chicken, score increases by one, and gameSpeed itself slowly rises with the score so the game gets progressively harder

🎓 Concepts You'll Learn

Game state machinesFunction-based OOP constructors (this.method)AABB collision detectionScrolling backgroundsDOM buttons inside a p5 sketchProcedural obstacle spawningloop()/noLoop() controlTouch vs keyboard input handling

📝 Code Breakdown

Chicken()

This function acts like a class in plain JavaScript: calling 'new Chicken()' creates an object with its own x/y/velocity properties and methods (show, jump, duck, stand, update) attached via 'this'. It's a common pattern before ES6 class syntax became widespread, and it's still perfectly valid p5.js code.

🔬 The -15 value sets how hard the chicken launches upward. What happens to the jump arc if you change it to -25? What if you change it to -8?

  this.jump = function() {
    if (!this.isJumping) {
      this.vy = -15; // Higher jump
      this.isJumping = true;
      this.isDucking = false; // Can't duck while jumping
    }
  };
function Chicken() {
  this.x = 50;
  this.y = groundY - 40; // Top-left of the bounding box
  this.w = 30; // Effective width for standing bounding box
  this.h = 40; // Effective height for standing bounding box
  this.vy = 0; // Vertical velocity
  this.gravity = 1;
  this.isJumping = false;
  this.isDucking = false;

  this.show = function() {
    fill(255, 200, 0); // Yellow for chicken body
    noStroke();

    if (this.isDucking) {
      // Ducking chicken shape
      // Body (squashed oval)
      ellipse(this.x + this.w * 0.75, this.y + this.h * 0.75, this.w * 1.5, this.h * 0.5);
      // Head (slightly lower)
      ellipse(this.x + this.w * 1.2, this.y + this.h * 0.7, this.w / 2, this.h / 2);
      // Beak
      fill(255, 100, 0);
      triangle(this.x + this.w * 1.2 + this.w / 4, this.y + this.h * 0.7,
               this.x + this.w * 1.2 + this.w / 4, this.y + this.h * 0.7 + this.h / 8,
               this.x + this.w * 1.2 + this.w / 2, this.y + this.h * 0.7 + this.h / 16);
      // Legs (shorter)
      stroke(150, 75, 0); // Brown for legs
      strokeWeight(2);
      line(this.x + this.w * 0.75 - 5, groundY, this.x + this.w * 0.75 - 5, groundY + 5);
      line(this.x + this.w * 0.75 + 5, groundY, this.x + this.w * 0.75 + 5, groundY + 5);
    } else {
      // Standing chicken shape
      // Body (oval)
      ellipse(this.x + this.w / 2, this.y + this.h / 2, this.w, this.h);
      // Head (smaller circle)
      ellipse(this.x + this.w, this.y + this.h / 4, this.w / 2, this.h / 2);
      // Beak (triangle)
      fill(255, 100, 0); // Orange for beak
      triangle(this.x + this.w + this.w / 4, this.y + this.h / 4,
               this.x + this.w + this.w / 4, this.y + this.h / 4 + this.h / 8,
               this.x + this.w + this.w / 2, this.y + this.h / 4 + this.h / 16);
      // Comb (small triangles)
      fill(200, 0, 0); // Red for comb
      triangle(this.x + this.w, this.y, this.x + this.w + 5, this.y - 5, this.x + this.w + 10, this.y);
      // Legs (lines)
      stroke(150, 75, 0); // Brown for legs
      strokeWeight(2);
      line(this.x + this.w / 2 - 5, groundY, this.x + this.w / 2 - 5, groundY + 10);
      line(this.x + this.w / 2 + 5, groundY, this.x + this.w / 2 + 5, groundY + 10);
    }
  };

  this.jump = function() {
    if (!this.isJumping) {
      this.vy = -15; // Higher jump
      this.isJumping = true;
      this.isDucking = false; // Can't duck while jumping
    }
  };

  this.duck = function() {
    if (!this.isJumping) {
      this.isDucking = true;
    }
  };

  this.stand = function() {
    this.isDucking = false;
  };

  this.update = function() {
    // Apply gravity
    this.y += this.vy;
    this.vy += this.gravity;

    // Prevent going below ground
    this.y = constrain(this.y, 0, groundY - this.h);

    // If on ground and not ducking, reset jumping state
    if (this.y >= groundY - this.h && !this.isDucking) {
      this.vy = 0;
      this.isJumping = false;
    }
    // If on ground and ducking, reset jumping state
    else if (this.y >= groundY - this.h && this.isDucking) {
      this.vy = 0;
      this.isJumping = false;
      this.y = groundY - this.h / 2; // Chicken is half height when ducking
    }
  };
}
Line-by-line explanation (7 lines)

🔧 Subcomponents:

conditional Ducking vs Standing Shape if (this.isDucking) { ... } else { ... }

Draws a squashed body shape when ducking, or the full upright body/head/comb/beak/legs when standing

conditional Jump Guard if (!this.isJumping) { this.vy = -15; ... }

Only lets the chicken jump if it isn't already mid-air, preventing double/infinite jumps

calculation Physics Step this.y += this.vy; this.vy += this.gravity;

Moves the chicken by its current velocity, then accelerates that velocity downward by gravity - the classic Euler-integration jump arc

conditional Landing State Reset if (this.y >= groundY - this.h && !this.isDucking) { ... }

Detects when the chicken has touched the ground again and resets vy/isJumping so it can jump again

this.x = 50;
The chicken always stays at a fixed horizontal position - it never actually 'runs forward', the world scrolls past it instead
this.y = groundY - 40;
Positions the top of the chicken's bounding box so its feet sit on the ground line
this.gravity = 1;
How much downward acceleration is added to vy every frame - this is what pulls the chicken back down after a jump
if (this.isDucking) { ... } else { ... }
Chooses which set of ellipse/triangle/line calls to draw depending on whether the chicken is currently ducking
this.vy = -15; // Higher jump
Setting a negative vertical velocity launches the chicken upward instantly; gravity then slows and reverses it each frame
this.y = constrain(this.y, 0, groundY - this.h);
Clamps the chicken's y position so it can never fly above the top of the screen or sink below the ground
this.y = groundY - this.h / 2; // Chicken is half height when ducking
When landing while ducking, the chicken is repositioned lower since its effective height is halved
Bomb()

Bomb demonstrates a mini state machine inside a single game object: 'active' -> 'exploding' -> 'exploded'. This pattern (an object owning its own state string) is a clean way to manage short animations without extra global variables.

🔬 This map() call grows the explosion up to 2.5x its original width. What happens visually if you change 2.5 to 6?

      let explosionSize = map(this.explosionFrameCount, 0, this.explosionDuration, this.w, this.w * 2.5); // Make it slightly larger
      let alpha = map(this.explosionFrameCount, 0, this.explosionDuration, 255, 0); // Fades out
function Bomb() {
  this.w = random(30, 50); // Bomb width
  this.h = this.w; // Bomb height (make it a circle for collision)
  this.x = width;
  this.y = groundY - this.h; // Place on the ground
  this.type = 'bomb'; // Added type for collision logic
  this.state = 'active'; // 'active', 'exploding', 'exploded'
  this.explosionFrameCount = 0;
  this.explosionDuration = 30; // Frames for explosion animation

  this.show = function() {
    if (this.state === 'active') {
      fill(0); // Black for bomb body
      noStroke();
      ellipse(this.x + this.w / 2, this.y + this.h / 2, this.w, this.h); // Main bomb body

      // Fuse
      fill(100); // Gray for fuse
      rect(this.x + this.w / 2 - this.w / 10, this.y - this.h / 4, this.w / 5, this.h / 4);
    } else if (this.state === 'exploding') {
      // Simple explosion effect: growing red/yellow circle
      let explosionSize = map(this.explosionFrameCount, 0, this.explosionDuration, this.w, this.w * 2.5); // Make it slightly larger
      let alpha = map(this.explosionFrameCount, 0, this.explosionDuration, 255, 0); // Fades out
      noStroke(); // No stroke for explosion
      fill(255, 0, 0, alpha); // Red fading out
      ellipse(this.x + this.w / 2, this.y + this.h / 2, explosionSize);
      fill(255, 200, 0, alpha); // Yellow fading out
      ellipse(this.x + this.w / 2, this.y + this.h / 2, explosionSize * 0.7);
    }
  };

  this.update = function() {
    if (this.state === 'active') {
      this.x -= gameSpeed;
    } else if (this.state === 'exploding') {
      this.explosionFrameCount++;
      // The game over will be triggered by `gameOverTriggered` in `playGame`
      // This just continues the animation for a bit if the loop hasn't stopped yet.
      if (this.explosionFrameCount >= this.explosionDuration) {
        this.state = 'exploded';
      }
    }
  };
}
Line-by-line explanation (5 lines)

🔧 Subcomponents:

conditional Active vs Exploding Draw if (this.state === 'active') { ... } else if (this.state === 'exploding') { ... }

Draws either the round bomb-with-fuse shape, or a fading red/yellow explosion animation

conditional Explosion Timeout if (this.explosionFrameCount >= this.explosionDuration) { this.state = 'exploded'; }

Flags the bomb as fully exploded after 30 frames so it can be removed from the obstacles array

this.w = random(30, 50); // Bomb width
Gives each bomb a random size between 30 and 50 pixels so obstacles look varied
this.h = this.w; // Bomb height (make it a circle for collision)
Making height equal width keeps the bomb's collision box square, matching its circular appearance
this.state = 'active'; // 'active', 'exploding', 'exploded'
Tracks which phase of its life the bomb is in - this drives both what's drawn and whether it still counts for collisions
let explosionSize = map(this.explosionFrameCount, 0, this.explosionDuration, this.w, this.w * 2.5);
Uses map() to grow the explosion circle from its original size up to 2.5x as the animation plays
let alpha = map(this.explosionFrameCount, 0, this.explosionDuration, 255, 0);
Fades the explosion's transparency from fully opaque (255) to fully invisible (0) over its duration

Bullet()

Bullet shows how sin() combined with frameCount can create organic, wave-like motion without any physics simulation - a very common trick for enemy movement patterns in 2D games.

🔬 The 0.05 controls how fast the bullet bobs up and down. What happens if you raise it to 0.2? Does the motion feel more chaotic or more predictable?

  this.update = function() {
    this.x -= gameSpeed * 1.2; // Bullet flies slightly faster
    this.y = this.moveOffsetY + sin(frameCount * 0.05 * this.moveSpeedY) * this.moveAmplitudeY;
  };
function Bullet() {
  this.w = 50;
  this.h = 20; // Bullet height
  this.x = width;
  this.y = random(groundY - 120, groundY - 60); // Bullet flies at different heights
  this.type = 'bullet'; // Added type for collision logic
  this.vy = 0; // For simple up/down movement
  this.moveSpeedY = random(0.5, 1.5);
  this.moveAmplitudeY = random(10, 30);
  this.moveOffsetY = this.y;

  this.show = function() {
    fill(100); // Gray for bullet
    noStroke();
    // Bullet shape (rounded rectangle)
    rect(this.x, this.y, this.w, this.h, 0, 0, this.h / 2, this.h / 2);
  };

  this.update = function() {
    this.x -= gameSpeed * 1.2; // Bullet flies slightly faster
    this.y = this.moveOffsetY + sin(frameCount * 0.05 * this.moveSpeedY) * this.moveAmplitudeY;
  };
}
Line-by-line explanation (4 lines)

🔧 Subcomponents:

calculation Sine Wave Bobbing this.y = this.moveOffsetY + sin(frameCount * 0.05 * this.moveSpeedY) * this.moveAmplitudeY;

Makes the bullet bob smoothly up and down using a sine wave instead of moving in a straight line

this.y = random(groundY - 120, groundY - 60); // Bullet flies at different heights
Spawns the bullet at a random height in the air, sometimes forcing the player to duck instead of jump
this.moveOffsetY = this.y;
Remembers the bullet's starting height so the sine wave can oscillate around that center point rather than around zero
this.x -= gameSpeed * 1.2; // Bullet flies slightly faster
Bullets move 20% faster than the base game speed, making them a quicker threat than bombs
this.y = this.moveOffsetY + sin(frameCount * 0.05 * this.moveSpeedY) * this.moveAmplitudeY;
Combines frameCount, a per-bullet speed, and sin() to create a smooth up-and-down bobbing motion unique to each bullet

checkCollision()

AABB (Axis-Aligned Bounding Box) collision is the simplest and cheapest way to detect overlap between rectangles in 2D games - no trigonometry needed, just four comparisons. It's 'axis-aligned' because it assumes the rectangles never rotate.

🔬 chickenW becomes 1.5x wider while ducking. What happens to how forgiving the game feels if you lower that multiplier to 1? What if you raise it to 2.5?

  if (chicken.isDucking) {
    chickenX = chicken.x;
    chickenY = chicken.y + chicken.h / 2; // Ducking chicken's y starts lower
    chickenW = chicken.w * 1.5; // Wider when ducking
    chickenH = chicken.h / 2; // Shorter when ducking
  } else {
function checkCollision(chicken, obstacle) {
  let chickenX, chickenY, chickenW, chickenH;

  // Define chicken's bounding box based on its state
  if (chicken.isDucking) {
    chickenX = chicken.x;
    chickenY = chicken.y + chicken.h / 2; // Ducking chicken's y starts lower
    chickenW = chicken.w * 1.5; // Wider when ducking
    chickenH = chicken.h / 2; // Shorter when ducking
  } else {
    chickenX = chicken.x;
    chickenY = chicken.y;
    chickenW = chicken.w;
    chickenH = chicken.h;
  }

  // Simple AABB (Axis-Aligned Bounding Box) collision detection
  return (
    chickenX < obstacle.x + obstacle.w &&
    chickenX + chickenW > obstacle.x &&
    chickenY < obstacle.y + obstacle.h &&
    chickenY + chickenH > obstacle.y
  );
}
Line-by-line explanation (3 lines)

🔧 Subcomponents:

conditional Ducking Bounding Box if (chicken.isDucking) { ... } else { ... }

Swaps in a wider, shorter bounding box while ducking so bullets can be dodged by ducking under them

calculation AABB Overlap Test return (chickenX < obstacle.x + obstacle.w && chickenX + chickenW > obstacle.x && ...)

The classic 4-condition rectangle-overlap test: true only if the two boxes overlap on both the x and y axes

if (chicken.isDucking) { ... }
Uses a different, flatter hitbox while ducking so the chicken can genuinely avoid overhead bullets
chickenY = chicken.y + chicken.h / 2;
Shifts the hitbox's top edge down since a ducking chicken's collision area starts lower on screen
return (chickenX < obstacle.x + obstacle.w && chickenX + chickenW > obstacle.x && chickenY < obstacle.y + obstacle.h && chickenY + chickenH > obstacle.y);
Two rectangles overlap only if each one's left edge is left of the other's right edge, AND each one's top edge is above the other's bottom edge - all four comparisons must be true

setup()

setup() runs once when the sketch starts. Here it prepares the canvas, positions the scrolling ground, creates the chicken, and builds (but hides) the DOM buttons used for difficulty selection later.

function setup() {
  createCanvas(windowWidth, windowHeight);
  groundY = height - 50;
  groundX1 = 0;
  groundX2 = width; // Second ground segment for seamless scrolling

  chicken = new Chicken();

  // Create Easy button
  easyButton = createButton('Easy');
  easyButton.position(width / 2 - 120, height / 2 + 80); // Position below instructions
  easyButton.mousePressed(startGameEasy);
  easyButton.hide(); // Hide initially

  // Create Hard button
  hardButton = createButton('Hard');
  hardButton.position(width / 2 + 20, height / 2 + 80); // Position below instructions
  hardButton.mousePressed(startGameHard);
  hardButton.hide(); // Hide initially
}
Line-by-line explanation (7 lines)
createCanvas(windowWidth, windowHeight);
Makes the canvas fill the entire browser window so the game works on any screen size
groundY = height - 50;
Places the ground line 50 pixels up from the bottom of the canvas, leaving room for a visible ground strip
groundX2 = width; // Second ground segment for seamless scrolling
Sets up a second ground rectangle positioned one full screen-width to the right, so when the first scrolls off, the second is already in place
chicken = new Chicken();
Creates the chicken game object using the Chicken constructor function
easyButton = createButton('Easy');
Creates a real HTML button element layered over the canvas using p5's DOM API
easyButton.mousePressed(startGameEasy);
Wires the button up so clicking it calls startGameEasy()
easyButton.hide(); // Hide initially
Keeps the button invisible until the start screen actually needs to show it

draw()

draw() is p5.js's main animation loop, running continuously at (up to) 60 frames per second. Here it acts as a simple state-machine router, delegating all the real work to one of three screen functions depending on gameState.

function draw() {
  background(220); // Light gray background

  if (gameState === 'start') {
    startScreen();
  } else if (gameState === 'playing') {
    playGame();
  } else if (gameState === 'gameOver') {
    gameOverScreen();
  }
}
Line-by-line explanation (4 lines)

🔧 Subcomponents:

conditional Game State Router if (gameState === 'start') { ... } else if (gameState === 'playing') { ... } else if (gameState === 'gameOver') { ... }

Decides which screen-drawing function to call this frame based on the current gameState string

background(220); // Light gray background
Clears the whole canvas every frame with a light gray so nothing from the previous frame lingers
if (gameState === 'start') { startScreen(); }
While on the menu, draws the title text and difficulty buttons
} else if (gameState === 'playing') { playGame(); }
During active gameplay, runs the entire update-and-draw logic for the ground, chicken, and obstacles
} else if (gameState === 'gameOver') { gameOverScreen(); }
After a collision, shows the final score and difficulty buttons again so the player can retry

startScreen()

This function only draws the menu - it doesn't handle input directly. Clicking works because the buttons already have mousePressed() callbacks attached in setup(), and keyboard input is handled separately in keyPressed().

function startScreen() {
  fill(0);
  textSize(32);
  textAlign(CENTER, CENTER);
  text('Chicken Run!', width / 2, height / 2 - 50);
  textSize(24);
  text('Press SPACE / UP arrow or tap to start (Default speed)', width / 2, height / 2);
  // Removed "tap and hold to duck" as touch is now tap-to-jump
  text('Press DOWN arrow to duck (desktop only)', width / 2, height / 2 + 30);

  // Show difficulty buttons on start screen
  easyButton.show();
  hardButton.show();
  // Removed: restartButton.hide(); // Ensure restart button is hidden
}
Line-by-line explanation (3 lines)
textAlign(CENTER, CENTER);
Makes all following text() calls center themselves on the given x,y coordinate rather than starting from the left edge
text('Chicken Run!', width / 2, height / 2 - 50);
Draws the game title centered horizontally, slightly above the vertical middle of the screen
easyButton.show();
Makes the previously-hidden Easy button visible so the player can click it

gameOverScreen()

Because startGameEasy()/startGameHard() both call resetGame(), reusing the same buttons for 'restart' avoids needing a separate restart button - clicking either difficulty button both resets and restarts the game.

function gameOverScreen() {
  fill(0);
  textSize(48);
  textAlign(CENTER, CENTER);
  text('GAME OVER!', width / 2, height / 2 - 30);
  textSize(32);
  text('Final Score: ' + score, width / 2, height / 2 + 10);

  // Show only difficulty buttons on game over screen
  // Removed: restartButton.show();
  easyButton.show();
  hardButton.show();
}
Line-by-line explanation (2 lines)
text('Final Score: ' + score, width / 2, height / 2 + 10);
Displays the score the player reached before crashing, using string concatenation to combine text and a number
easyButton.show();
Reveals the difficulty buttons again so the player can immediately start a new run

startGameEasy()

This is a button-click handler wired up in setup() via easyButton.mousePressed(startGameEasy). It's a good example of connecting DOM events to changes in your p5 sketch's state.

function startGameEasy() {
  gameSpeed = easyGameSpeed; // Set game speed to Easy
  resetGame(gameSpeed); // Pass the desired speed to resetGame
  hideAllButtons();
  gameState = 'playing';
  loop();
}
Line-by-line explanation (3 lines)
gameSpeed = easyGameSpeed; // Set game speed to Easy
Copies the Easy preset speed into the active gameSpeed variable
resetGame(gameSpeed); // Pass the desired speed to resetGame
Clears score/obstacles and reinitializes the chicken using that speed
loop();
Resumes p5's draw loop in case it had been stopped by noLoop() after a previous game over

startGameHard()

Nearly identical to startGameEasy() except it uses hardGameSpeed - a small amount of code duplication that could be merged into a single startGame(speed) function.

function startGameHard() {
  gameSpeed = hardGameSpeed; // Set game speed to Hard
  resetGame(gameSpeed); // Pass the desired speed to resetGame
  hideAllButtons();
  gameState = 'playing';
  loop();
}
Line-by-line explanation (2 lines)
gameSpeed = hardGameSpeed; // Set game speed to Hard
Copies the Hard preset speed into the active gameSpeed variable
hideAllButtons();
Hides the Easy/Hard buttons since they're no longer needed once gameplay starts

startGameDefault()

This gives players a quick way to jump straight into the game without deciding on a difficulty, using a middle-ground speed.

function startGameDefault() { // For starting with Spacebar/Tap when no difficulty is chosen
  gameSpeed = defaultGameSpeed; // Ensure default speed
  resetGame(gameSpeed); // Pass the default speed to resetGame
  hideAllButtons();
  gameState = 'playing';
  loop();
}
Line-by-line explanation (1 lines)
gameSpeed = defaultGameSpeed; // Ensure default speed
Used when the player skips picking a difficulty and just presses SPACE or taps the screen

hideAllButtons()

A small helper to avoid repeating '.hide()' calls in every start-game function - a simple example of reducing duplication.

function hideAllButtons() {
  // Removed: restartButton.hide();
  easyButton.hide();
  hardButton.hide();
}
Line-by-line explanation (2 lines)
easyButton.hide();
Hides the Easy button's HTML element from view
hardButton.hide();
Hides the Hard button's HTML element from view

resetGame()

Centralizing all reset logic in one function keeps startGameEasy/Hard/Default consistent - they all call resetGame() rather than repeating the same five lines.

function resetGame(initialSpeed) { // Added initialSpeed parameter
  score = 0;
  obstacles = [];
  gameSpeed = initialSpeed; // Use the provided initial speed
  chicken = new Chicken(); // Re-initialize chicken
  groundX1 = 0;
  groundX2 = width;
}
Line-by-line explanation (3 lines)
score = 0;
Resets the score counter back to zero for a fresh run
obstacles = [];
Empties the obstacles array, removing any leftover bombs or bullets from the previous game
chicken = new Chicken(); // Re-initialize chicken
Replaces the old chicken object with a brand new one, resetting its position and velocity

playGame()

playGame() is the heart of the sketch - it updates and draws everything for a single frame of active gameplay: the scrolling ground, the chicken, obstacle spawning, obstacle updates/collisions, and the score display. Understanding this one function means understanding the whole game loop.

🔬 This spawns a new obstacle every 40-90 frames depending on speed, with a 60% chance of a bomb. What happens if you change 0.6 to 0.1 so bullets are much more common?

  if (frameCount % int(map(gameSpeed, easyGameSpeed, hardGameSpeed * 1.5, 90, 40)) === 0) {
    if (random() < 0.6) { // 60% chance of Bomb
      obstacles.push(new Bomb());
    } else { // 40% chance of Bullet
      obstacles.push(new Bullet());
    }
  }
function playGame() {
  // Update game speed based on score (capped)
  // This will scale the chosen difficulty (easy, default, or hard) upwards
  gameSpeed = constrain(gameSpeed + score / 100, easyGameSpeed, hardGameSpeed * 1.5); // Cap hard mode scaling higher

  // --- Ground ---
  fill(100); // Darker gray for ground
  noStroke();
  rect(groundX1, groundY, width, 50);
  rect(groundX2, groundY, width, 50);

  groundX1 -= gameSpeed;
  groundX2 -= gameSpeed;

  if (groundX1 <= -width) groundX1 = width;
  if (groundX2 <= -width) groundX2 = width;

  // --- Chicken ---
  chicken.update();
  chicken.show();

  // --- Obstacles ---
  // Spawn obstacles
  // Spawns more frequently as speed increases (based on current gameSpeed)
  if (frameCount % int(map(gameSpeed, easyGameSpeed, hardGameSpeed * 1.5, 90, 40)) === 0) {
    if (random() < 0.6) { // 60% chance of Bomb
      obstacles.push(new Bomb());
    } else { // 40% chance of Bullet
      obstacles.push(new Bullet());
    }
  }

  let gameOverTriggered = false; // Flag to trigger game over after obstacle loop

  for (let i = obstacles.length - 1; i >= 0; i--) {
    let obstacle = obstacles[i];

    // Only update active bombs, and all bullets
    if ((obstacle.type === 'bomb' && obstacle.state === 'active') || obstacle.type === 'bullet') {
      obstacle.update();
    }
    obstacle.show();

    // Check for collision *only if the obstacle is active*
    if (obstacle.state === 'active' && checkCollision(chicken, obstacle)) {
      if (obstacle.type === 'bomb') {
        obstacle.state = 'exploding'; // Start explosion animation for visual feedback
        obstacle.explosionFrameCount = 0;
        gameOverTriggered = true; // IMMEDIATE GAME OVER
      } else if (obstacle.type === 'bullet') {
        gameOverTriggered = true; // IMMEDIATE GAME OVER
      }
      break; // Exit obstacle loop immediately if collision found
    }

    // Remove obstacles that are off-screen OR have finished exploding (if they somehow didn't cause game over)
    if (obstacle.x + obstacle.w < 0 || obstacle.state === 'exploded') {
      obstacles.splice(i, 1);
      score++; // Increase score for dodging/exploding an obstacle
    }
  }

  // Trigger game over *after* the obstacle loop
  if (gameOverTriggered) {
    gameState = 'gameOver';
    noLoop(); // Stop the draw loop
    return; // Exit playGame()
  }

  // --- Score ---
  fill(0);
  textSize(24);
  textAlign(RIGHT, TOP);
  text('Score: ' + score, width - 10, 10);
}
Line-by-line explanation (9 lines)

🔧 Subcomponents:

calculation Progressive Speed Increase gameSpeed = constrain(gameSpeed + score / 100, easyGameSpeed, hardGameSpeed * 1.5);

Slowly ramps gameSpeed up as score increases, capped between the easy speed and 1.5x the hard speed

conditional Ground Segment Wrap if (groundX1 <= -width) groundX1 = width;

Teleports a ground segment back to the right edge once it's fully scrolled off-screen, creating an endless loop

conditional Obstacle Spawner if (frameCount % int(map(gameSpeed, easyGameSpeed, hardGameSpeed * 1.5, 90, 40)) === 0) { ... }

Spawns a new obstacle at an interval that shrinks (spawns more often) as gameSpeed increases

for-loop Obstacle Update/Collision Loop for (let i = obstacles.length - 1; i >= 0; i--) { ... }

Iterates backwards through all obstacles to update, draw, collision-check, and safely remove them (splice-safe direction)

conditional Collision Outcome if (obstacle.state === 'active' && checkCollision(chicken, obstacle)) { ... }

Triggers either a bomb explosion animation or immediate game over depending on obstacle type when a hit is detected

gameSpeed = constrain(gameSpeed + score / 100, easyGameSpeed, hardGameSpeed * 1.5);
Every frame, adds a tiny bit of speed proportional to score, but constrain() keeps it from ever going below the easy speed or above 1.5x the hard speed
groundX1 -= gameSpeed;
Scrolls the first ground segment left at the current game speed
if (groundX1 <= -width) groundX1 = width;
Once a ground segment has scrolled completely off the left side, snap it back to just past the right edge so it looks continuous
chicken.update(); chicken.show();
Every frame, first recalculates the chicken's physics, then draws it in its new position
if (frameCount % int(map(gameSpeed, easyGameSpeed, hardGameSpeed * 1.5, 90, 40)) === 0) {
Uses frameCount's remainder to spawn an obstacle only on certain frames; map() converts the current speed into a spawn interval, so higher speed means smaller intervals (more frequent spawns)
for (let i = obstacles.length - 1; i >= 0; i--) {
Loops backward through the obstacles array so that removing items with splice() during the loop doesn't skip any elements
if (obstacle.state === 'active' && checkCollision(chicken, obstacle)) {
Only checks for a hit if the obstacle hasn't already been hit (still 'active'), avoiding double-triggering game over
if (obstacle.x + obstacle.w < 0 || obstacle.state === 'exploded') {
Cleans up obstacles that have scrolled fully off-screen or finished their explosion animation, and awards a point for surviving them
if (gameOverTriggered) { gameState = 'gameOver'; noLoop(); return; }
If any collision happened this frame, immediately switches to the game-over state and stops the draw loop with noLoop() to freeze the final frame

keyPressed()

keyPressed() is a p5.js built-in event function that fires once every time any key is pressed down, giving you access to key (the character) and keyCode (for special keys like arrows).

function keyPressed() {
  if (gameState === 'start' && (key === ' ' || keyCode === UP_ARROW)) {
    startGameDefault();
  } else if (gameState === 'playing' && (key === ' ' || keyCode === UP_ARROW)) {
    chicken.jump();
  } else if (gameState === 'playing' && keyCode === DOWN_ARROW) {
    chicken.duck();
  }
}
Line-by-line explanation (3 lines)

🔧 Subcomponents:

conditional Key + State Router if (gameState === 'start' && ...) { ... } else if (gameState === 'playing' && ...) { ... }

Interprets the same key differently depending on whether the game is on the start screen or actively playing

if (gameState === 'start' && (key === ' ' || keyCode === UP_ARROW)) {
On the start screen, pressing Space or Up Arrow begins the game at default speed
} else if (gameState === 'playing' && (key === ' ' || keyCode === UP_ARROW)) {
During gameplay, the same keys instead trigger a jump
} else if (gameState === 'playing' && keyCode === DOWN_ARROW) {
The Down Arrow key makes the chicken duck while playing

keyReleased()

Pairing keyPressed() (start ducking) with keyReleased() (stop ducking) lets the duck action last exactly as long as the key is held down, rather than being a one-shot toggle.

function keyReleased() {
  if (gameState === 'playing' && keyCode === DOWN_ARROW) {
    chicken.stand();
  }
}
Line-by-line explanation (2 lines)
if (gameState === 'playing' && keyCode === DOWN_ARROW) {
Checks that Down Arrow was the key just released while the game is active
chicken.stand();
Makes the chicken stand back up as soon as the duck key is let go

touchStarted()

touchStarted() is p5.js's mobile equivalent of mousePressed(). Because DOM buttons sit on top of the canvas, this function has to manually check button coordinates to avoid triggering both a button click AND a game-start tap at the same time.

function touchStarted() {
  if (gameState === 'start') {
    // Check if the touch is within the bounds of the Easy button
    if (easyButton.elt.offsetParent) { // Check if button is visible
      let easyBtnX = easyButton.position().x;
      let easyBtnY = easyButton.position().y;
      let easyBtnW = easyButton.width;
      let easyBtnH = easyButton.height;
      if (mouseX >= easyBtnX && mouseX <= easyBtnX + easyBtnW &&
          mouseY >= easyBtnY && mouseY <= easyBtnY + easyBtnH) {
        // Touch was on easy button, let its handler take over
        return false;
      }
    }

    // Check if the touch is within the bounds of the Hard button
    if (hardButton.elt.offsetParent) { // Check if button is visible
      let hardBtnX = hardButton.position().x;
      let hardBtnY = hardButton.position().y;
      let hardBtnW = hardButton.width;
      let hardBtnH = hardButton.height;
      if (mouseX >= hardBtnX && mouseX <= hardBtnX + hardBtnW &&
          mouseY >= easyBtnY && mouseY <= easyBtnY + easyBtnH) {
        // Touch was on hard button, let its handler take over
        return false;
      }
    }

    // If touch was not on a button, start with default speed
    startGameDefault();
  } else if (gameState === 'playing') {
    // On touch devices, a tap is a jump (like the Google Dino game)
    if (!chicken.isJumping) {
      chicken.jump();
    }
  }
  return false; // Prevent default browser behavior (scrolling)
}
Line-by-line explanation (5 lines)

🔧 Subcomponents:

conditional Button Bounds Check if (mouseX >= easyBtnX && mouseX <= easyBtnX + easyBtnW && mouseY >= easyBtnY && mouseY <= easyBtnY + easyBtnH) { return false; }

Manually checks whether a tap landed on a DOM button so the sketch doesn't also treat it as 'start the game'

conditional Tap-to-Jump if (!chicken.isJumping) { chicken.jump(); }

Treats any tap during gameplay as a jump input, similar to the classic Chrome dinosaur game

if (easyButton.elt.offsetParent) { // Check if button is visible
offsetParent is null when an element is hidden, so this skips the bounds check entirely if the button isn't shown
if (mouseX >= easyBtnX && mouseX <= easyBtnX + easyBtnW && mouseY >= easyBtnY && mouseY <= easyBtnY + easyBtnH) {
Manually tests whether the touch coordinates fall inside the button's rectangle on screen
startGameDefault();
If the tap wasn't on either button, it's treated as 'just start the game' with default speed
if (!chicken.isJumping) { chicken.jump(); }
During gameplay, any tap makes the chicken jump (as long as it isn't already mid-jump)
return false; // Prevent default browser behavior (scrolling)
Stops the browser's default touch behavior (like page scrolling) from interfering with the game

touchEnded()

This function is mostly commented-out placeholder code, showing where a tap-and-hold duck mechanic could be added later. Right now it exists purely to cancel default touch behavior.

function touchEnded() {
  // Currently, touchEnded doesn't trigger stand() because ducking by touch isn't implemented.
  // The chicken will stand automatically once it lands from a jump.
  // If you want a ducking mechanism on touch, we'd need to differentiate between tap and tap-and-hold.
  // For now, it's tap-to-jump.
  // if (gameState === 'playing') {
  //   chicken.stand(); // Stop ducking when touch ends (if ducking was implemented by touch)
  // }
  return false; // Prevent default browser behavior (scrolling)
}
Line-by-line explanation (1 lines)
return false; // Prevent default browser behavior (scrolling)
The only active line - prevents the browser's default touch-release behavior (like scrolling) from firing

windowResized()

windowResized() is a p5.js built-in that fires whenever the browser window changes size, letting responsive sketches like this one keep their layout (canvas, ground, buttons) correctly positioned.

function windowResized() {
  resizeCanvas(windowWidth, windowHeight);
  groundY = height - 50;
  chicken.y = groundY - chicken.h; // Adjust chicken position
  // Removed: restartButton.position(width / 2 - 60, height / 2 + 50);
  easyButton.position(width / 2 - 120, height / 2 + 80); // Reposition difficulty buttons
  hardButton.position(width / 2 + 20, height / 2 + 80);  // Reposition difficulty buttons
}
Line-by-line explanation (4 lines)
resizeCanvas(windowWidth, windowHeight);
Resizes the p5 canvas to match the browser window whenever it's resized
groundY = height - 50;
Recalculates where the ground line should be for the new canvas height
chicken.y = groundY - chicken.h; // Adjust chicken position
Snaps the chicken back onto the (possibly moved) ground line so it doesn't appear floating or sunk
easyButton.position(width / 2 - 120, height / 2 + 80); // Reposition difficulty buttons
Moves the Easy button to stay centered relative to the new window size

📦 Key Variables

chicken object

Holds the player-controlled Chicken instance with its position, velocity, and jump/duck state

let chicken;
obstacles array

Stores all currently active Bomb and Bullet objects on screen

let obstacles = [];
groundY number

The y-coordinate of the ground line, used to position the chicken and obstacles consistently

let groundY;
groundX1 number

Horizontal position of the first scrolling ground segment

let groundX1;
groundX2 number

Horizontal position of the second scrolling ground segment, used to create seamless infinite scrolling

let groundX2;
score number

Counts how many obstacles the player has successfully dodged in the current run

let score = 0;
gameState string

Tracks which screen is currently active: 'start', 'playing', or 'gameOver'

let gameState = 'start';
easyButton object

A DOM button element that starts the game at Easy speed when clicked

let easyButton;
hardButton object

A DOM button element that starts the game at Hard speed when clicked

let hardButton;
easyGameSpeed number

The starting scroll/game speed used for Easy mode

let easyGameSpeed = 3;
defaultGameSpeed number

The scroll/game speed used when starting without picking a difficulty

let defaultGameSpeed = 5;
hardGameSpeed number

The starting scroll/game speed used for Hard mode, and the base for the difficulty cap

let hardGameSpeed = 7;
gameSpeed number

The single current speed value that the ground, chicken-relative obstacles, and spawn rate all read from each frame

let gameSpeed = defaultGameSpeed;

🔧 Potential Improvements (4)

Here are some ways this code could be enhanced:

BUG touchStarted()

The bounds check for the Hard button mistakenly compares mouseY against easyBtnY/easyBtnH instead of hardBtnY/hardBtnH, so tapping the Hard button area on touch devices may not register correctly.

💡 Change 'mouseY >= easyBtnY && mouseY <= easyBtnY + easyBtnH' inside the Hard button check to use hardBtnY and hardBtnH instead.

STYLE checkCollision(chicken, obstacle)

The function parameter is named 'chicken', which shadows the global 'chicken' variable of the same name - this works but is confusing to read and easy to introduce bugs with later.

💡 Rename the parameter to something like 'player' or 'bird' to avoid shadowing the global variable.

FEATURE gameOverScreen() / resetGame()

After a game over, the player must re-click Easy or Hard even to replay the same difficulty - there's no quick 'Play Again' shortcut.

💡 Store the last-used difficulty and add a keyboard shortcut (e.g. SPACE) on the game-over screen that calls resetGame() with that same speed.

PERFORMANCE playGame() obstacle spawn condition

int(map(...)) is recalculated every single frame just to compute a modulo check, even though gameSpeed rarely changes drastically between frames.

💡 Recalculate the spawn interval only when gameSpeed changes meaningfully (e.g. every 10 frames or when score crosses a threshold) instead of every frame.

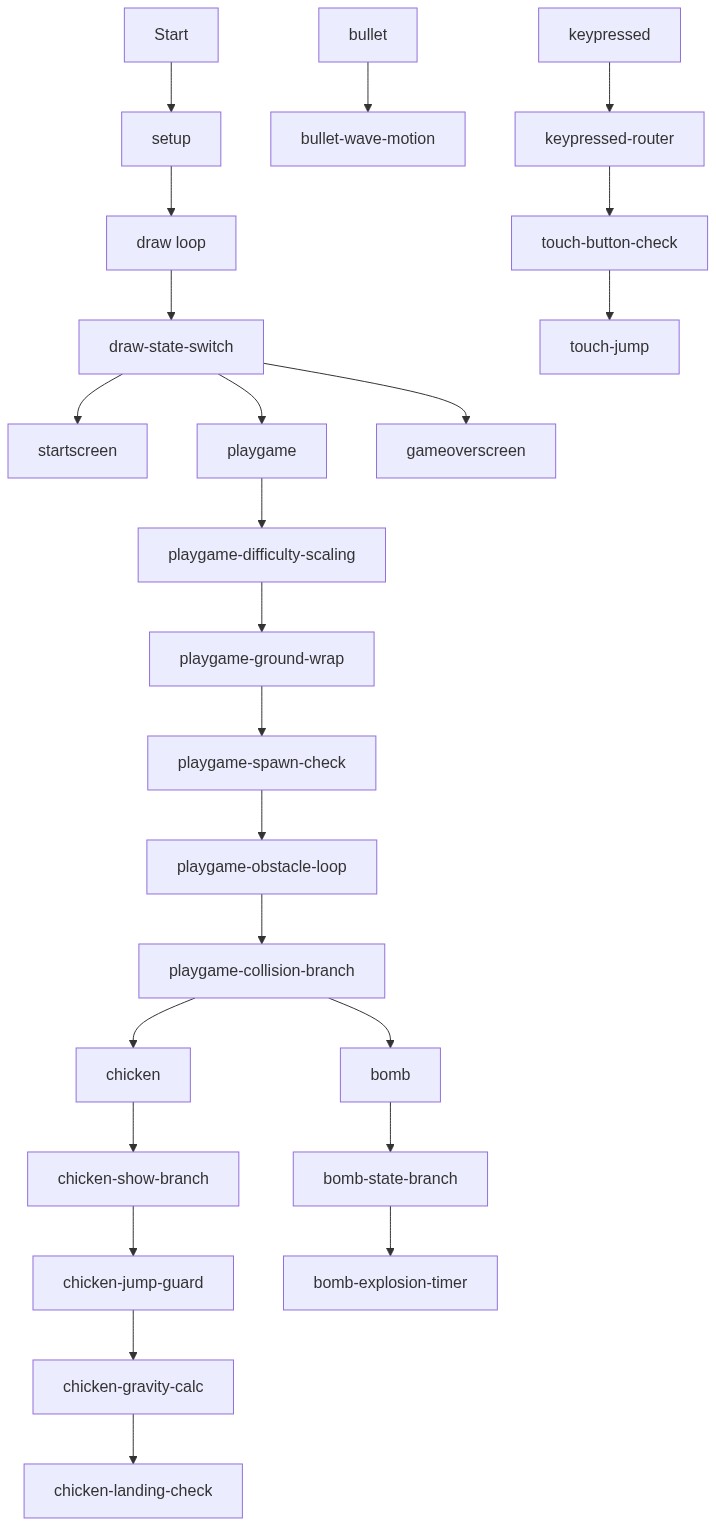
🔄 Code Flow

Code flow showing chicken, bomb, bullet, checkcollision, setup, draw, startscreen, gameoverscreen, startgameeasy, startgamehard, startgamedefault, hideallbuttons, resetgame, playgame, keypressed, keyreleased, touchstarted, touchended, windowresized

💡 Click on function names in the diagram to jump to their code

graph TD start[Start] --> setup[setup] setup --> draw[draw loop] draw --> draw-state-switch[draw-state-switch] draw-state-switch --> startscreen[startscreen] draw-state-switch --> playgame[playgame] draw-state-switch --> gameoverscreen[gameoverscreen] playgame --> playgame-difficulty-scaling[playgame-difficulty-scaling] playgame-difficulty-scaling --> playgame-ground-wrap[playgame-ground-wrap] playgame-ground-wrap --> playgame-spawn-check[playgame-spawn-check] playgame-spawn-check --> playgame-obstacle-loop[playgame-obstacle-loop] playgame-obstacle-loop --> playgame-collision-branch[playgame-collision-branch] playgame-collision-branch --> bomb[bomb] playgame-collision-branch --> chicken[chicken] chicken --> chicken-show-branch[chicken-show-branch] chicken-show-branch --> chicken-jump-guard[chicken-jump-guard] chicken-jump-guard --> chicken-gravity-calc[chicken-gravity-calc] chicken-gravity-calc --> chicken-landing-check[chicken-landing-check] bomb --> bomb-state-branch[bomb-state-branch] bomb-state-branch --> bomb-explosion-timer[bomb-explosion-timer] bullet --> bullet-wave-motion[bullet-wave-motion] keypressed --> keypressed-router[keypressed-router] keypressed-router --> touch-button-check[touch-button-check] touch-button-check --> touch-jump[touch-jump] click setup href "#fn-setup" click draw href "#fn-draw" click draw-state-switch href "#sub-draw-state-switch" click startscreen href "#fn-startscreen" click playgame href "#fn-playgame" click gameoverscreen href "#fn-gameoverscreen" click playgame-difficulty-scaling href "#sub-playgame-difficulty-scaling" click playgame-ground-wrap href "#sub-playgame-ground-wrap" click playgame-spawn-check href "#sub-playgame-spawn-check" click playgame-obstacle-loop href "#sub-playgame-obstacle-loop" click playgame-collision-branch href "#sub-playgame-collision-branch" click bomb href "#fn-bomb" click chicken href "#fn-chicken" click chicken-show-branch href "#sub-chicken-show-branch" click chicken-jump-guard href "#sub-chicken-jump-guard" click chicken-gravity-calc href "#sub-chicken-gravity-calc" click chicken-landing-check href "#sub-chicken-landing-check" click bomb-state-branch href "#sub-bomb-state-branch" click bomb-explosion-timer href "#sub-bomb-explosion-timer" click bullet-wave-motion href "#sub-bullet-wave-motion" click keypressed href "#fn-keypressed" click keypressed-router href "#sub-keypressed-router" click touch-button-check href "#sub-touch-button-check" click touch-jump href "#sub-touch-jump"

❓ Frequently Asked Questions

What does the chicken run sketch create visually?

The chicken run sketch visually features a cute cartoon chicken that runs across a scrolling landscape, complete with jumping and ducking animations to avoid obstacles. The ground scrolls horizontally, enhancing the sense of motion, while the chicken's vibrant yellow color contrasts with the background.

How can users interact with the chicken run game?

Users can interact with the chicken run game by pressing keys to make the chicken jump or duck as it navigates obstacles. Additionally, players can choose between easy or hard modes, which affects the game speed and difficulty of the challenges.

What creative coding technique does the chicken run sketch demonstrate?

The chicken run sketch demonstrates the use of collision detection and gravity to create a dynamic gameplay experience. By implementing physics principles, the chicken's movements are affected by gravity, allowing for realistic jumping and ducking actions.

How could someone recreate a scrolling ground effect in p5.js?

To recreate a scrolling ground effect in p5.js, you can use two background images or rectangles that move horizontally across the canvas. By updating their positions in each frame and resetting them when they move off-screen, you can create a seamless loop of scrolling ground.

Preview

chicken run - p5.js creative coding sketch preview
Sketch Preview
Code flow diagram showing the structure of chicken run - Code flow showing chicken, bomb, bullet, checkcollision, setup, draw, startscreen, gameoverscreen, startgameeasy, startgamehard, startgamedefault, hideallbuttons, resetgame, playgame, keypressed, keyreleased, touchstarted, touchended, windowresized
Code Flow Diagram